Friday 15 April 2011

What went well, and what didn't.....

Ok, nearing the end of the module, the blogs need to be handed in. We still have a few weeks before the exhibition though. What I felt went well...... For me, our biggest strength was teamworking. The graphics group gelled well despite taking on a stranger in the form of Sean Mills. The reasons our group worked well together were structure and teamwork. From the start I made the concious desicion to create a Graphics Team Blog that served as a way of assigning tasks and recording progress. From a personal point of view, I've really enjoyed the challenge of creating an exhibition and it's something quite close to my heart as I spend a lot of my spare time visiting exhibitions, museums and galleries. What didn't go well...... It's proving difficult extracting the finances fromk some members of the class. Only a few have in anyway contributed. One member of the Graphics Team rarely attended uni outside of the core lectures. This made communication with that person difficult.

Friday 8 April 2011

Making the underground sign....

From the inception of the underground theme there were a couple of key pieces we wanted to include in the exhibitions themeing. One was the map box which is now complete and the other is an underground sign attached to a pillar. To manufacture the sign, I first cut some modelling foam to A3 size using the hot wire machine.


Thick glossy white paper was then taped to all the edges which would ensure the whole foam block was covered over once the signs were applied. Slots were machined on the drill to enable the velcro straps which we bought from B&Q to pass through.

Richard and I also shaped one end of the block to achieve an 11cm radius so it would correctly mate with the pillar.


We had the underground images printed on the thick glossyA3 paper by the media department and then applied to the front and back of the foam block with spraymount.

Velcro was used to secure the sign to the pillar so as not to damage it's paintwork.

We were pretty pleased with the result and it also looks quite professional.

Wednesday 23 March 2011

Final alterations to the business card designs....

Although the tutor liked the overall layout of this version of the calling card, the '66' and the AT sybols in my email needed attention.


Here I've Photoshopped the 66 to be shorter and easier to distinguish as numbers and created an @ symbol in a similar style to the text.


I'm quite pleased with this design now and I'll get some test prints done to see how the colours look.

Tuesday 15 March 2011

Alteration to the background......

After discussing the background designs with the tutor, she suggested having a white background to align with the websites palette and also reduce the background image to a strip down the left hand side.......


To be honest, I don't think it's as effective as the original. You can't see enough of the background image to be able to see it's relevance and the overall layout is unharmonious

Thursday 10 March 2011

More exhibition background ideas......

In these tests I've used iconic images of the underground like the escalators and inside the trains and lowered the opacity to 30% so it fades out a little and would bring the 3 A3 images out more.
.

.

.
In this version, Daryl suggested joining the A3 images with 'tube lines' I've taken the line downward too so it could maybe connect to the line on the floor?
.

Wednesday 9 March 2011

Reworking the business card designs.....

After speaking to the lecturer about my business card designs, we decided to try out a few variations on the vintage red, off white, grey and black theme.
The tutor also felt that the title Designer could be moved to the back as this was of secondary importance, my name and email address should be the primary text.
I changed the text font slightly to SF Americana Dreams as this was more legible.

This was my original design with the Velocette font.....
.

.
With the new font and the removal of the word Designer....
.

.
Emphasising my name by changing the colour to off white........
.

.
And in this one, I rotated the grey bands to see how that would look......
.

Friday 4 March 2011

Obtaining prices for the posters.....

Richard and I popped into Fastsigns in Chelmsford yesterday to enquire about A0 prices and also chat about finishes etc.

The staff were really helpful and gave us a quote for £247.20 for the 10 posters which is very reasonable

Display boards.....

One of the group tasks that has been assigned to me is the surround for the diplay board. Our tutor has asked us to work with an A0 overall size displaying three A3 images of our work.
It's important that the background design is not over fussy and doesn't overpower the main 3 images.

The group spoke about continuing the coloured tubeline theme which will be taped onto the floor up on to the boards.
Here I've taken that theme and dropped a diffused colour over an a section of the undergound map. It would be cool if the map was broken up into 10 parts, 1 for each class member.
The large white areas represent the three A3 image areas whilst the smaller ones below them would be a description. The area down the bottom right would be for the individuals biography.

Group blog.....

I've created a group blog now to act as a central point to list tasks and their progress. All the group members will have administrator access to the blog so they can update the posts as required.
The blog can be found at...

http://exhibitiongroup.blogspot.com

Friday 25 February 2011

Pitching the theme....

On the 18th of Feb the groups had an oppertunity to present their ideas to to the class and the tutor.
Rich, Sean and myself pitched the Underground theme with a presentation we had created in Powerpoint.
We had themed the individual slides with the an underground logo and added imformation about the history of the underground, colour palettes and why we felt it would suit our exhibition.
Here are a few of the 13 slides we presented:
Title slide....
Evolution of underground map showing how graphic designers looked at creating a schematic that was easy to follow from the original geographical style layout maps.....
The colours would be play a key role in our theme as they are heavily used on the undergound to designate the individual tubelines.....
We also wanted to include a brief costing as this would be a major factor in what could realistically be achieved......
The other groups pitched these themes:
A theme based on an exhibition entitled Shadows where images were created with clever use of lighting. The group were unsure about whether lighting could be used in this way in the well lit mezzanine exhibition area.
An I-Exhibition theme that used clean lines and white surfaces inspired by Apple products. In this case the group felt that although the concept was professional and suited our graphic design background it may be a little too expensive to create the props and stands in this fashion.
When the presentations were over the group gave constructive feedback and votes were taken to find the groups favourite. We were pleased to find our theme was chosen.

Wednesday 23 February 2011

Imagining The Exhibition.....

I manipulated this image in Photoshop to give a rough feel for how the exhibition may look. One of the key concepts is that colour coded 'tubelines' would radiate out from an underground map and lead to the individual students work.

I'd like to see actual glowing 'UNDERGROUND' signage but I'm not sure how feasable this would be?

I also thought it would be nice to keep the theme going by altering the text on the underground map and replacing it with module titles. This could be done randomly in a wordsearch kind of way or all along one 'line' eg: Central Line could represent Sustainable Design and Innovation.
Here's a quick mock up to see how the coloured key could also be changed along with a few of the stations.....

Looking At The Exhibition Space....

This is the space we've got to work with in the Micheal Ashcroft building on the Mezzanine level.

We're antipating the walkway that leads through from the vending area being the primary entrance to the exhibition area........


The ceiling in this space lends itself to the underground theme as it has a slightly curved aspect similar to the underground tunnels.....


The doors on the far wall in this photo lead through to an auditoreum. It's not clear how often these will be in use in May as a lot of students will have finished or be on breaks in May. It will be best to leave it clear just in case though.


We are hoping to move the majority of the seating away from this area as it will make the exhibition area too busy and detract from the theme.

Calling Card Samples....

Here are some vintage style fonts I have found on a website called dafont.com .....


Below I've tried combining the commonly used Hot Rod themes of flames and checks to give a vintage theme. The text and colours were added to Photoshop and I copied the text to another layer to achieve the shadow effect.


Obviously I'd need to add the rest of the details but it's just a test.

In this calling card design I've muted the colours but still used colours from the Hot Rod palette.
The 'Since 66' text in this image was created using a graphics tablet. I borrowed one from the technicians then set about designing the text from scrtach in Photoshop. This was a time consuming process but I'm pleased with the result and it's nice to use something unique rather than standard fonts.

Vintage Text Fonts....

I've researched the commonly used Hot Rod text fonts and added a few below to sereve as inspiration....


Personal Branding Inspiration....

I'm really into vintage customised cars and the whole Hot Rod scene and I'd like to use some of those influences in my personal branding. To strengthen the theme I was also born in 1966 and my email address is pfrosty66@hotmail.co.uk so taking the Route 66 logo as inspiration would be cool too.


There are common themes running through Hod Rod Kulture including chequered flags, airbrushed flames and pinstriping. Colour palletes typically include primary Yellows, Reds, Blacks and Whites.

These vintage magazines are typical of the colour themes...


Pinstriping (the application of lines of paint using a purpose made long brush forming graceful flowing patterns) has always been linked with the Hot Rod Kulture and has inspired clothing designs, stickers and many magazines and books.

The pinstriping forms could also be interwoven into my personal branding. Here are a few examples of pinstriping application....


To make my calling cards stand out from from the crowd it would be cool to get them embroidered into a vintage themed sew on patch. This wouldn't be cheap but there are suppliers that have computer controlled embroidering machoines so it is possible.
If it was unrealistic to have them embroidered, the effect could possibly be simulated in Photoshop.
Here are some examples of vintage sew on patches.....

Friday 4 February 2011

Mood Board.....

I've started to collect a few images together to help inspire me with the themes.....


The underground map could be used as inspiration for a colour theme with a maps key giving the students name and allocating them with with a colour. A line could then be taped onto the floor to lead to thier work. The background of their work would also be colour coded.


Paint pots could be left to dry and made to look like the lines had been painted or just ran out of the pots.


Tube stations and slogans could also be used to continue the theming.


Another theme could be shapes......


Maybe a large cube supended from the ceiling with images printed onto each side? A large sphere could have images projected onto it distorting the images into intersting shapes.

Rich suggested an abstract design, that also be quite mind altering... Instead of just decorating the walls, you could do the ceiling and floor?

Tuesday 1 February 2011

Museum Visit......

To help with the planning of the groups exhibition, the lecturer asked us to visit a museum to get a feel for how the whole thing is arranged.

I researched what the current exhibitions in London were and decided to visit the Gabriel Orozco exhibition at the Tate Modern as his works looked very appealing.


The artist was born in Xalalp, Veracruz, Mexico in 1962 and emerged as an artist during the 1990's
The exhibition guide reads..... Gabriel Orozco's art belongs to an age in which people, images and commodities are no longer rooted in a single geographical location, but are continually on the move.


The artist himself is equally at home in Mexico, New York and Paris, and regularly makes and exhibits work all around the world. The result is a remarkable diversity of approaches, each stemming from the artist's focussed response to a particular place and time.

"I'm not inventing, just reinterpreting" Orozco has said. He will take up existing objects and alter or reconfigure them. Familier items are transformed or placed in a new context, often with a keen understanding of the wider associations they carry.

Even as I approached the Tate Modern, striking posters advertising the exhibition were placed some distance away from the building. These were to bring in 'passers by' who may be teased by the image and poster. One of Orozco's signature pieces, the 'Black Kites' skull was being used as branding and was a theme carried through all the promotional items.


As I approcahed the Tate Moderns massive old pump buiding you couldn't miss the fact that Orozco's work was being exhibited, his name was emblazoned on the building in huge text and giant banners fluttered outside.


Once inside the building I purchased my ticket and made my way to the 4th floor where the exhibition was taking place.

You couldn't really lose track of where his work was being displayed as even the 'signposting' carried his name.


Once on the 4th floor, I approached the exhibition with some excitement as the posters and spaces leading to the entrance were flooded with his work. the whole entrance door wall had been screen printed with one of his photographic pieces 'Island Within An Island' 1993 and a short video presentation on the artist was playing nearby.


Me outside the entrance to the exhibition


Once inside I made a concious decision to ignore the actual works at first and concentrate on how the exhibition had been arranged and structured.

A series of nine adjacent square and rectangular rooms had been acquired for the exhibits. The walls were all white washed and the floor was a light coloured polished wood.

Lighting was provided by the museums flexible ceiling grid and rail system meaning the curator Jessica Morgan alongside Orozco, could light the works to their best effect. Generally speaking, there was a soft ambient light being used along with spotlights directly lighting some of the pieces.


Lintels 2001

Broadly speaking, the works and rooms were laid out in dated sequence, 1990 to 2010.

An introduction to the artist and the exhibition was the first thing you see as you enter. This introduction and the details of each work adjacent to the piece were not mounted on boards but had been directly transferred to the wall in mid grey print.
Some works had been grouped in themes whereas others were presented individually to increase their impact.

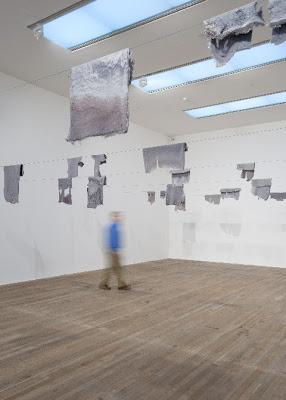
One piece of work that was particulary interesting from an exhibition point of view is Chicotes 2010. This is a work of tyre fragments collected by Orozco along Mexican highways for years. The pieces are then laid out according to the individual space they are to be exhibited in. This means that the work as it appears in New York for instance would differ from the London piece.


This peice was being lit both from a single line of spotlights along one long side and the galleries tall thin windows on the other toward one end. I noticed that the artist had placed large pieces of solidified molten aluminium on some of the tyre shreads near the widows. I believe this was to further emphasis the way the natural light from the windows interacted with the work.

Another piece, 'Carambole With Pendulum' 1996 engaged visitors by nature of the way it could be interacted with. Orozco had taken a French version of Billiards played on a table with no holes and substituted the regular rectangle table with an oval. A red ball is suspended from the ceiling on a thin wire and once swinging, just skims the tables surface.

Snooker cues are provided so visitors can try their hand at the game making up their own rules.


After leaving the exhibition, I visited the gift and book shop. Both had Orozco related items on sale including books, t-shirts and postcards. The gallery had made maximum use of the exposure and had placed the merchandising right at the entrance to the shops.

Communication of the message:

The fundemental point of any exhibition is communicate a message. This can be achieved with images, sound, lighting, arifacts or more usually a combination of them.

The 'message' is of course subjective and what means something to one visitor may mean something completely different to another.

From a purely personal point of view, the principal message Orozco's work conveyed to me was that of how he interacted and modified his environment by taking everyday out of their natural context. This was achieved by altering them sometimes subtly but more often radically which gave them a completely different purpose.

The layout, exhibits and lighting made the exhibition an enjoyable place to be and I really enjoyed my visit. Although I don't have a smartphone, the gallery had provided an interactive guide which would of bought each piece to life a little more.
This was available at www.tate.org/go/orozcomobile.

Further information on the artist and exhibition can be found at: http://www.tate.org.uk/modern/default.shtm